9th century Thrissur Temple - A temple like no other with unique architecture

Thrissur, also known as Trichur, is a city in the southern Indian state of Kerala. It is known for its rich cultural heritage and is home to many ancient temples, including the famous Thrissur temple or Thrissur Vadakkumnathan Temple.

Thrissur Vadakkumnathan Temple, one of the four similar entrances

The Thrissur Vadakkumnathan Temple, also known as the "Temple of Lord Shiva," is one of the most important and ancient temples in Kerala. It is located in the heart of the city and is dedicated to Lord Shiva, one of the principal deities of Hinduism. The temple is known for its beautiful architecture and intricate carvings. The temple's main attraction is the massive "Shiva Lingam," which is considered one of the world's largest.

Brief History of Thrissur temple
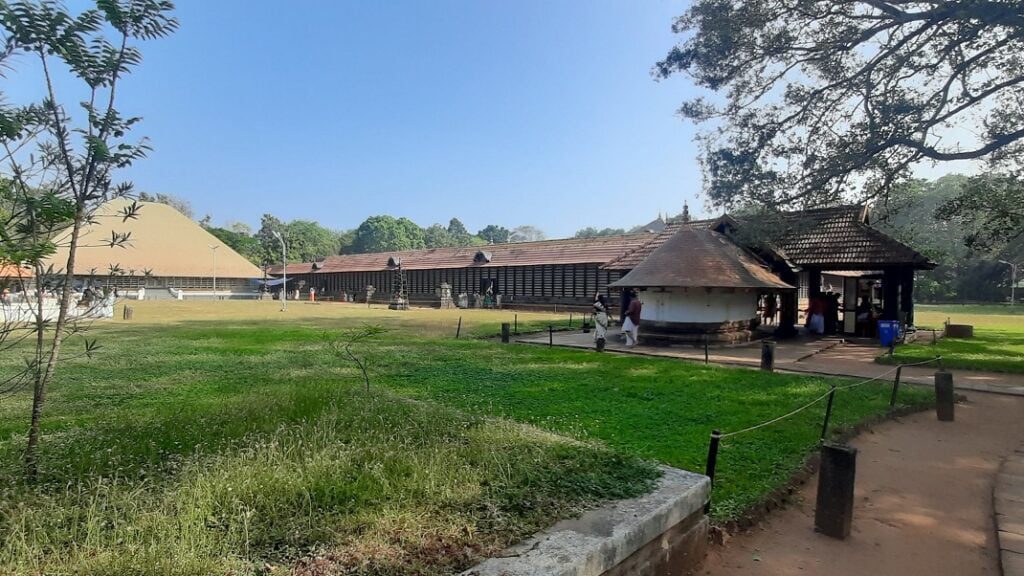
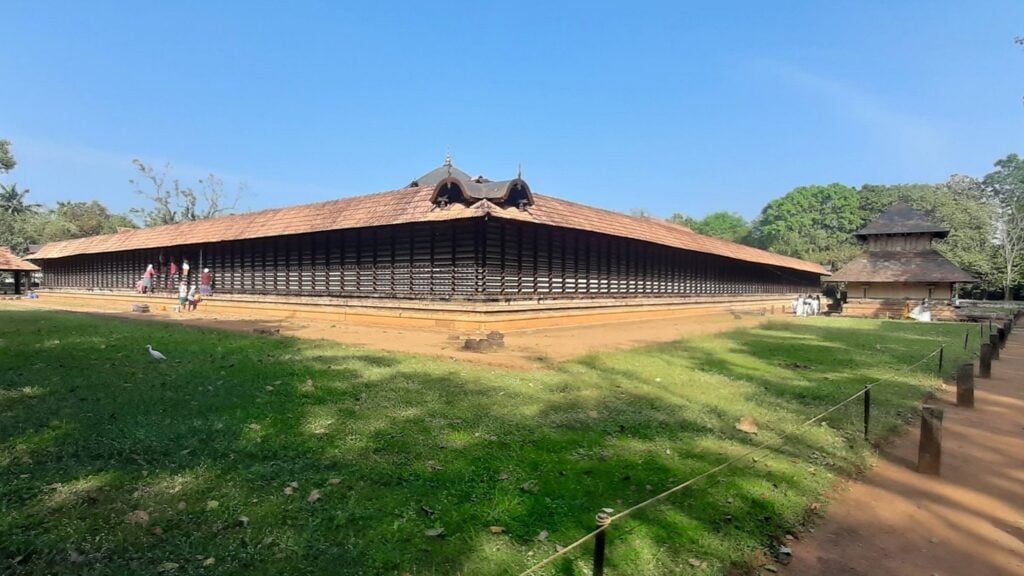
inside the Thrissur temple complex

The temple's history dates back to the 9th century AD and it has undergone several renovations and additions over the centuries. The temple is also famous for its annual "Thrissur Pooram" festival, which is celebrated in April or May and is considered one of the biggest and most colorful festivals in Kerala. The festival is a grand display of elephant processions, traditional music and dance performances, and fireworks.

The temple is open to visitors throughout the year and is an important pilgrimage site for Hindus. Ideal to visit early in the morning. The temple complex is huge and an ideal place if you want to meditate early in the morning. Visitors can also explore the temple's many shrines and sculptures, and learn about its rich history and cultural significance.

Banyan tree, other entrance, Ravindra Joisa, and the Thrissur temple complex

Things to note at the Thrissur temple complex

Few things to make a note of while entering the temple. Both males and females will have to follow the local dress code. Photography isn't allowed in the inner or central portion of the temple. The entire city is around this temple and the temple complex is at the center of this town. The place is well connected by public transport. The temple did not have any paid special entry during my visit.

In conclusion, the Thrissur Vadakkumnathan Temple is a must-visit destination for anyone interested in ancient temples, culture, and history of India, and the temple is an excellent representation of the rich cultural heritage of Kerala. If you are in and around Munnar or Kochi, then a visit to this place is a must. You may want to read more on the Kerala Tourism website. While this place is also known for its best architecture, check out the architecture on the other side of India for its unique architecture - the Hawa Mahal in Jaipur India.
Other places to visit around Thrissur

There are many places to visit around Thrissur, Kerala, which offer a variety of experiences for tourists. Some of the popular places to visit near Thrissur include:

  • Athirapally Falls: Located about 60 kilometers from Thrissur, these falls are one of Kerala's most popular tourist destinations. The falls offer stunning views and are surrounded by lush green forests.
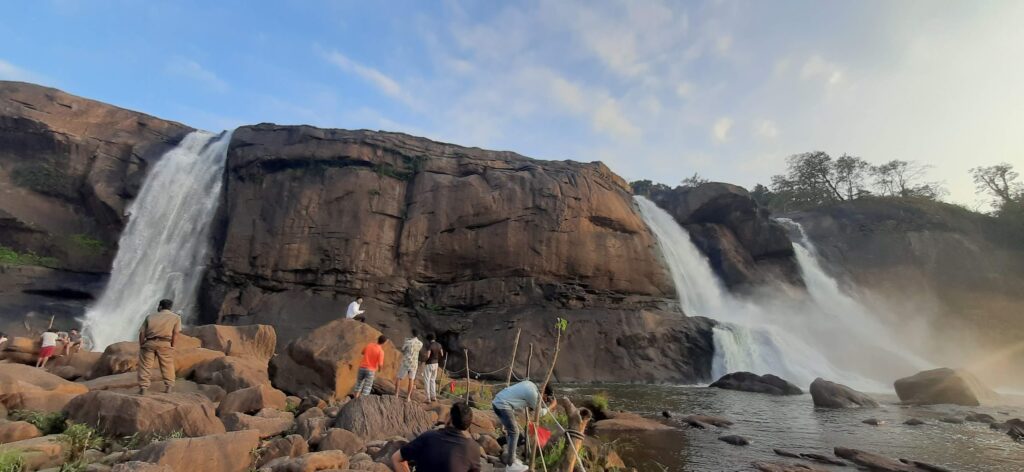
Athirapally Falls
  • Guruvayur Temple: This temple is one of the most important and ancient temples in Kerala and is located about 29 kilometers from Thrissur. The temple is dedicated to Lord Vishnu and is considered one of the most sacred places in India.
  • Chelakkara: This small town located about 20 kilometers from Thrissur is known for its traditional and ancient art forms, such as Kathakali and Mohiniyattam. Visitors can watch these art forms' performances and learn about traditional techniques.
  • Punnathur Kotta Elephant Sanctuary: This sanctuary is located about 15 kilometers from Thrissur and is home to a large number of elephants. Visitors can see the elephants up close and learn about their care and conservation.
  • Vadakkumnatha Temple: This temple is one of the most important temples in Kerala and is known for its beautiful architecture and intricate carvings. It is located in the heart of Thrissur city and is dedicated to Lord Shiva.
  • Peechi Dam: This dam is located about 20 kilometers from Thrissur and is a popular spot for picnics and boating. The dam is surrounded by lush green forests and offers scenic views.
  • Hill Palace Museum: This museum is located about 10 kilometers from Thrissur and is the largest archaeological museum in Kerala. It houses a collection of ancient artifacts and is set in a beautiful palace.
  • Chavakkad Beach: This beach is located about 10 kilometers from Thrissur and is known for its beautiful sunsets and clean sandy beach. It is a popular spot for swimming, sunbathing, and fishing.
  • Kerala Kalamandalam: This institution is located about 15 kilometers from Thrissur and is dedicated to the preservation and promotion of traditional arts of Kerala, such as Kathakali, Mohiniyattam, and Koodiyattam.
  • Koodalmanikyam Temple: This temple is located about 10 kilometers from Thrissur and is one of the few temples in India dedicated to Lord Bharata, the brother of Lord Rama. The temple is known for its unique architecture and beautiful carvings.

Cloud Storage for Photographers - 11 important benefits

When we talk about photo storage, we generally don't think about cloud storage for photographers, but rather external hard drives and other storage devices. But first, let me describe the circumstances that I went through and what caused me to alter my viewpoint. In this article, I will also discuss the advantages of cloud storage for photographers.

I used external hard drive HDDs that were 1 TB, 2 TB, 5 TB, and so on for a time, and one fine morning, some of the HDDs abruptly stopped working or crashed for no apparent reason. I attempted to recover it by sending it to the service center, and it was sent to the Netherlands for data recovery, only to receive a call after two months saying that the data could not be recovered and that I would have to pay the import duty for the damaged hard disc if I wanted the HDD back, to which I replied, "No Thanks."

cloud storage for photographers - image

The unfortunate thing is that I had created a partial backup of the images. The external hard disc, which contained 8 years of travel data, photos, and videos, has vanished. Cloud technology was still very new and pricey at the time. With all of the moving components within the hard disc HDD, I opted to go with the SSD - a solid-state device with no moving parts that are now used in virtually all laptops, is significantly smaller in size, and costs twice as much.

There is alternative NAS storage available too. This SSD's read-write performance is substantially faster and more reliable, and it is now a component of my travel equipment. But this is expensive, and if I want to produce two or three duplicates, I'll need an equivalent amount of hard drives. Taking backup, management of photographs, etc, made this excessively time-consuming and highly expensive. This is acceptable for little projects, but when you have a significant number of data, it becomes nearly hard to handle.

This is where the idea of cloud storage for photographers came from. With the lower cost of internet, both broadband and mobile data, and simple access, as well as the lower cost of cloud storage, I've been wondering why not migrate to the cloud instead of all these time-consuming responsibilities of maintaining data, hard drives, storage, safety, and so on. I performed some research, and this is what I discovered based on my personal usage, as well as why shifting to the cloud is a far better alternative.

Backup storage for photographers

As previously said, backup storage for photographers is a nightmare. To save 5 TB of data, you must have the same space or another hard disc of the same cost and capacity for only one backup, which is the bare minimum. Consider managing folders and files in each of these backups and duplicating on all copies. This is inconvenient when you have TBs of data storage. Most cloud storage service providers feature backup, so you don't have to think about it. You only need to upload and download photographs, and backup is handled automatically.

Cost of storage - cloud vs on-premise

An HDD has a limited lifespan, about 4 years on average if used intensively in my case. Because it has moving components, the more you transport it when traveling, the shorter its life, in my experience. It also relies on whether you removed your device carefully before disconnecting. Even while HDDs can manage it, the read-write head may not return to its default position on occasion (rarely), causing a problem.

cloud storage for photographers

There is no dedicated cloud storage for photographers, but there is cloud storage for images, the finest of which are Google Photos or Google Drive. There are other different cloud storage service providers, but I've been using Google Photos since my fourth HDD failed.

When it comes to costs, the costs would include hard disc costs (HDDs are less costly than SSDs), backup storage, safe storage of these hard discs, data recovery costs (very expensive), and file administration costs (in case of a large number of data). This is not the case with cloud storage.

As of this writing, the pricing of Google Photos is ₹1,300 a year for 100 GB. You may check the latest price and different plans available on the Google One homepage. I would strongly advise using cloud storage. The plan becomes less expensive with a yearly plan and more storage. Begin with the simplest layout and gradually raise the size as you upload.

cloud storage for photographers - storage plan
Google one cloud storage for photographers - storage plan

Upload and transfer time

Some high-end external drives are power-hungry. Data transfer is slow in HDDs and slightly faster in SSDs. However, for cloud storage, it is simply the network bandwidth. Again, retrieving data via archival cloud storage takes time, although this is mostly for industrial or business usage. When it comes to cloud storage for photographers, the standard package is enough.

Compression and quality

If you are a professional photographer, you may always save your photographs in raw format. It should be noted that raw files are much larger than JPEG files. This is because raw files have all of the color information and can be retrieved while editing images, while the compressed JPEG format does not.

cloud storage for photographers - storage saver

However, if you are a semi-professional or a casual photographer and do not see a purpose for these raw files, there is no use in retaining them. For non-professional photographers, Google Photos or standard online storage is adequate. So, modify these files and convert them to a compressed high-quality JPEG format. Upload these JPEGs to the cloud. Many cloud storage providers further compress without much loss of quality, which is sufficient for social media use. You may even save the raw files.

Easy access to images

The photographs in Google Photos may be simply viewed using the cloud service provider's app. Many have party support, which allows us to access the editing tool and easily import from the cloud service provider. And this type of cloud storage for photographers' services might be really beneficial. It will be simpler to send directly from storage to your customer or on social media.

Location-based search made easier

Most cameras these days include GPS tracking, and the picture location data is collected when the shot is taken. The photo may be searched directly in the cloud storage for photographers rather than downloading or scrolling through the photographs as is the case with typical external hard drive storage. When you search in the search field, it will take you directly to the image from a place, which saves you a lot of time.

Portability

There's no need to be concerned about transporting the external hard drive safely. Cloud storage is the greatest solution for photographers. Simply log in and access it from any location and device. All you need is a device and an internet connection to get started. It even works with mobile data. So, the next time you go somewhere and forget to bring an additional memory card, you can always download your images to the cloud or connect your camera SD card to your phone through OTG and transfer the raw files to the cloud and erase the card. And the card is now ready to be used again. So there's no need to worry about transporting your hard disc.

Read text from Images

It is difficult to search through TBs of data. Cloud service providers such as Google can even scan text from a picture, search for that content, and return accurate search results in a matter of milliseconds. It's that simple, quick, and easy. In traditional image storage, you must examine each image and verify that it is the correct photo of the document. Consider looking through all of your files when you have TBs of data. It is nearly difficult, thus cloud storage for photographers is the best option.

Data Recovery

In the event of a hard disc crash, you must ship the hard disc to a service center, which will take a long time to recover, assuming it is recoverable. Furthermore, data recovery is quite expensive. So, unless this is for an inquiry, the data is simply not retrieved. When it comes to images, photographers will need all of the files, thus cloud storage for photographers is the greatest solution because data recovery is not an issue. Your data will be handled by cloud service providers. You may always download and keep a backup.

Security and safety

It is critical to keep the images from your assignment safe and secure. Data security is critical in cloud storage, and it will be extremely secure. If you are concerned about data abuse, you should always store conventional hard drives in a safe room or locker.

When cloud storage for photographers is not an option

When you are working in the field or at a client location, for example, I went on a travel assignment to the mountains where there is no network, in this case, I usually carry an SSD external device or multiple memory cards. Why SSD instead of HDD is much faster and more reliable even though it is costlier. Cloud storage for photographers will not be beneficial and can be used once they are back at home or in their studio.

As a photographer, these are the most important cloud storage benefits that I see. So, what is your view on cloud storage for photographers? By the way, hope you enjoyed reading this blog post. Buy me a coffee to support my work or you can go to my store to buy some of my images. Also, do not forget to join my FriendZone by signing up for my newsletter. Consider subscribing to my YouTube channel.

5 ways how a human touch in photography can have truly magical effects

If you're a landscape photographer, you might be wary about including the human touch in photography. And it's easy to understand why. For many different reasons, adding a human touch to photography may increase its effect. On the other side, particularly among landscape photographers, there is a desire to go away from other people and have a pure experience with nature, free of any human intervention.

The human touch in photography - Trekker in front of Mt Harmuk near Gangbal lake
Trekker in front of Mt Harmuk near Gangbal lake

Reasons for having a human touch in the photography

Human touch shows a sense of scale

For starters, it may give your scene a sense of scale. When it comes to art, the mystery is excellent, but showing size may be important if you want to express vastness, width, and grandeur. Even though this is Bhutan's largest Buddha statue, when photographed with a wide-angle lens, the image below will appear little. Placing people in front of the monument, on the other hand, will emphasize its size.

The largest statue of Buddha
The largest statue of Buddha, people in front show the scale.
Punakha Dzong
Ravindra Joisa standing in front of 12 feet high window.

Human touch might activate the subjective factor

The presence of a human figure might activate the subjective factor. In other words, the spectator may project himself or herself into the scene and feel as if they were there - or at least desire to be there. In the photograph below, from my Roopkund trek or the Bedni Budyal climb in the Himalayas, you can see trekkers trekking along the crest of Asia's greatest high altitude meadows, with the Himalayas in the backdrop. The spectator will feel as though they are truly thereby gazing at the photograph.

A strong and immediate focal point with the human touch

A human figure creates a strong and immediate focal point. Inserting a person into the scene might help you identify a landing spot for the eye if you're having trouble finding one. When there is no topic to focus on, add a human to the photo or walkabout to discover a subject instead of a human. As shown in the image below, adding humans, standing at the peak of Ettina Bhuja after a few hours of hiking through the jungle, gives a sense of success.

Patterns with Human touch

Here another approach to shooting individuals in a location is to look for or create patterns with the people. Photographing patterns from above, like in a bird's eye view viewpoint, is an excellent technique to create them. Lines, symmetrical patterns, and filling the frame with repetition are all wonderful pattern ideas to hunt for or develop with locals who are willing to be photographed. It's a terrific opportunity to be creative, which I believe is an essential component of photography, and because the results can be quite visually beautiful, it's always a good idea to consider including patterns in your photos. You might be interested in learning more about leading lines and adding people.

Trekkers hiking to Roopkund in the Himalayas
A group of trekkers - Roopkund trek in the Himalayas

It is not just the human touch

It is not just the human touch in photography, there can be any subject. In the above image, as you can see, there is a tent against the mountain behind. This was captured at Kanamo basecamp which is at around 16,000 feet above sea level. The Kanamo summit is at 19,600 feet and trekkers start from this place. Coming back to the topic, an image of this kind with only one subject can add a lot of mystery to the image and make it look more interesting.

Camping at Kanamo base camp.

I'd want to make a brief note. If you wish to sell a photograph for professional use, make sure to obtain the model release of the person in the image, as well as the property release if the image contains architecture. This is required when licensing the image or attempting to sell the image to stock agencies.

Didina village Bedni Bugyal trek and Roopkund trek
Didina village is a small settlement in the Himalayan mountain range.

Hope you enjoyed reading this blog post. Buy me a coffee to support my work or you can go to my store to buy some of my images. Also, do not forget to join my FriendZone by signing up for my newsletter. Consider subscribing to my YouTube channel.

Adventure hike to Ettina Bhuja summit through the super dense rainforest

Ettina Bhuja is located deep within the Western Ghats, famed for its dense rainforest and wild wildlife, in Shishila, Karnataka, India, around 15 kilometers from Dharmasthala. This location was named from the appearance it makes when viewed from a distance. It looks exactly like an ox's shoulder (Ettu - Ox, Bhuja - Sholder). Yes, Ettina Bhuja is an ox's shoulder. Ettina Bhuja is flanked by numerous other peaks, including Amedikallu.

Ettina Bhuja hike starting point

Ravindra Joisa at Ettina Bhuja summit

We began our journey at Anu Gowda's place. You can go to this location via bus, and their residence is the final stop. To get to their residence, there is a well-maintained asphalt road. We arrived here early in the morning. The climb is well-known in this area, and most of the divers can readily direct you to the Ettina Bhuja starting point.

Crossing the stream

We began our trip after breakfast, passing through their farms and over a river. Because the water level is not very high, you can easily cross this river without getting your shoes wet. This may not be the case during the monsoon season. Soon after crossing the river, there is a temple where you can pray for a safe journey.

Hiking in the western ghats

Wildlife along the hiking trail

We continued for another 30 minutes until we came to a brook on the right, which was the last place we found water. Be cautious in this area because it is notorious for its wild elephants. We could clearly notice this due to the recent loss of trees and their manure. Villagers/Guides informed us that there were 12 elephants and a calf nearby, which might be deadly if an attack occurs.

We continued on, and the entire walking track from Anu Gowda's residence to the mountain is around 8 kilometers long. It takes about four hours to reach the summit. Two-thirds of the hike is in dense forest where you may stroll in the shade, but it is steep in some spots. There is a strong ascent just before reaching the summit.

The summit climb to Ettina Bhuja

Ettina Bhuja summit

Climbing the hill to the finish line is virtually steep and dangerous. You'll have to get down and move a little if you want to rest beneath a tree. Climbing from three sides is quite impossible unless you are a rock climber. However, the backside, which is not visible from afar, is a steady ascent to the top, with just the last section being a tight ascent. It's more akin to climbing a tree. There isn't enough area on top to camp, but there is plenty for great Instagram photographs. Even in the summer, there is an ice-cold stream just before the peak, which you can confirm with the locals.

Returning from Ettina Bhuja - the view of western ghats

Dakshina Kannada is on one side of the summit, while Shimoga is on the other. There is another method to reach the mountain, and on the way, there is an ancient temple that may be seen from the top. Many people use this as an escape route. It will be a shorter walk, only around 4 kilometers long, and there will be a jeep track. Because of the extreme warmth and humidity, trekking to this location during the summer might be difficult for first-timers. Be cautious and do not linger in the forest for an extended period of time.

Relaxing after the hike

Ettina Bhuja - relaxing after the hike

We returned to our starting location and spent the evening beside the river. We had an early dinner and spent time around the campfire before catching the local public night bus back to the city. If you are willing to spend two nights traveling to and from Bangalore, you may easily accomplish the hike in a day.

Ettina Bhuja YouTube video

https://youtu.be/HClwqT9oaD8

Hope you enjoyed reading this blog post. Buy me a coffee to support my work or you can go to my store to buy some of my images. Also, do not forget to join my FriendZone by signing up for my newsletter. Consider subscribing to my YouTube channel.

Handi Gundi | A Daring Night trek | Weekend Getaway from Bangalore

Ramanagara is well-known for silk farming and is one of Asia's major silk exporters. As a result, it is also known as 'Silk City.' Although the Handi Gundi hill has not been investigated and there is no evidence that it was dominated by the rulers, there is an intriguing legend about how the hill earned its name.

The myth says that a pig was grazing when it went up the hill and tumbled over the top without realizing it had reached the brink. A couple of other pigs followed this one, and they all fell as well. Handi means "Pig" in Kannada, while Gundi means "Fallen" off the cliff's edge.

Handi Gundi Night trek
Ravindra Joisa enjoying the city view from Handi Gundi Betta (hill), Ramnagar

Where is Handi Gundi Located?

There is a small town named Ramanagar, on the Bangalore Mysore highway, and is around 60 km from Bangalore. Handi Gundi is about 6 km before Ramnagar to the left. To reach this village you need to cross the railway track and go one km further. Wear proper shoes as there are reptiles that are poisonous and are not easily visible under low light.

The roadway that connects Bangalore and Mysore, as well as a lot of rail traffic. By the way, during my last visit, no permission was necessary, but today the site firmly demands a forest license to go on a trek to this place, and it is a criminal offense. So, seek the necessary authorization, and keep in mind that a night walk may not always be permitted. So, verify with the residents or the forest service. There is already a checkpoint with a signboard where the hiking path begins.

Handi Gundi Trek Starting point

We stopped our car near the pupil tree where there is a temple. This is the starting point to climb all the way up. We reached this place late at night and the entire village had gone to sleep. To reach the base of the peak, we had to cross the village and there were just too many street dogs enough for the villagers to wake up. The villagers are mainly farmers and go to sleep much earlier by 8 or 9 PM. We just continued walking and there is another historic temple after which the hard unknown trail starts. There is no trail as such and we lost our way. 

Handi Gundi Night trek - campfire
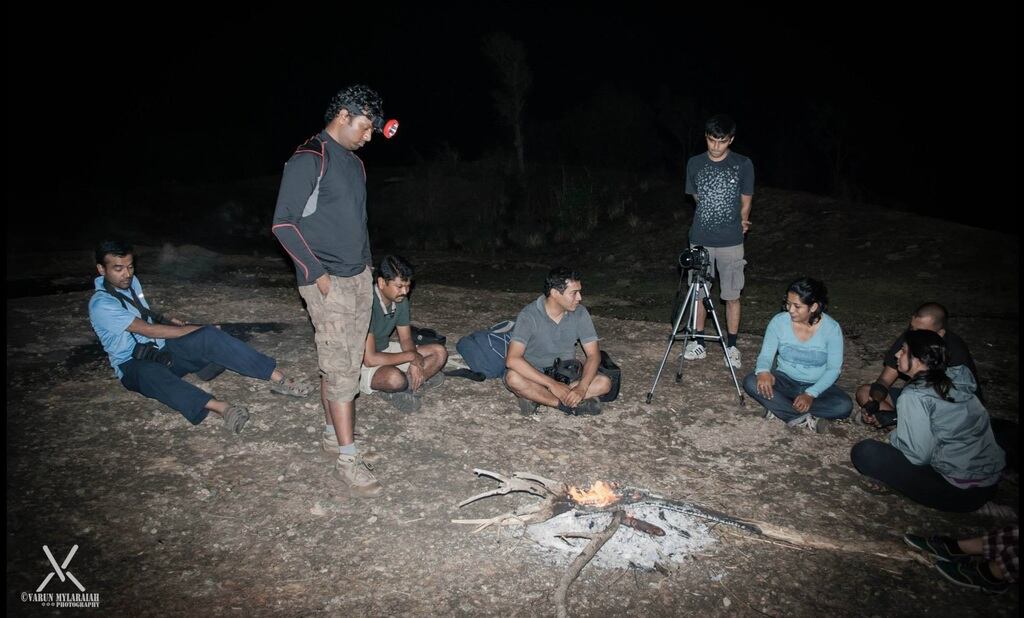
Campfire and our late-night discussion after reaching on top. Image Copyright: Varun

Handi Gundi Night Trek

Lucky it was a full moon and we had our GPS and torch ready. After trying here and there we made our own way through the nearby smaller hill. The total trek is for about an hour or 90 minutes. There is enough space on top for trekkers to sleep under the open sky. There is no source of water. The night view and early morning view from the peak are worth climbing.

At night it's the Ramanagar city view or the street light view and in the morning it's the mist - fog-covered nearby peaks. We spent a lot of time till late in the evening capturing photos and experimenting with light painting and low light photography. Don't forget to take mosquito repellent else you might keep yourself awake the whole night even if you are in a sleeping bag. The finest part about a night walk to Handi Gundi is that you get to see the top perspective of the city at night from afar.

Handi Gundi Night trek - Early morning
Hikers getting ready, folding their sleeping bags. Image Copyright: Varun

The next day morning, the 360-degree panoramic view of this place is mesmerizing. The nearby peak that pop-up above the fog-covered ground is truly a wonderful experience to witness. The place is known for leopards and there was death reported just a week after our visit in the same place. Check out the video below which will explain more. This is a nice weekend hangout place to kill time.

https://youtu.be/iYcueX0rFGs

Trek near Ramnagar

Handi Gundi provides a panoramic view of the surrounding hills from the summit, including the Ramadevara Betta, Uttari Betta, and many more unknown ones Betta means hill in Kannada and these hills are an ideal weekend getaway from Bangalore if you are planning to trek near Ramnagar. Depending on the time of year, the trip follows a mostly stony terrain with some muddy stretches and passes through moderate to dense vegetation. As our hike was late at night, we had to wait till sunrise to witness the beautiful landscape.

Ravindra Joisa Friend Zone
Night trek to Handi Gundi near Ramnagar, KA, India. Photo: © Ravindra Joisa

Hope you enjoyed reading this blog post. Buy me a coffee to support my work or you can go to my store to buy some of my images. Also, do not forget to join my FriendZone by signing up for my newsletter. Consider subscribing to my YouTube channel.

How to vlog while Hiking? - 7 valuable Tips

Vlog while hiking may be difficult, and it isn't as easy as it appears, given exhaustion after trekking, cold and terrible weather, and so on. It is not as simple as pulling out your camera and hitting the record button. Despite the fact that this is the greatest way to begin. I'm not a vlogging specialist, but I've gone on seven weeklong Himalayan treks as of this writing, and these days I make it a point to vlog while hiking each day and share my experience on YouTube. So, in this blog article, I'll provide some vlog while hiking tips that are ideal if you're thinking about doing the same.

Vlog while hiking with an Engaging Story

Vlog while hiking

An excellent outdoor video is more than just a collection of shots and events arranged in numerical order. Instead, your experiences must be reshaped into a compelling and intelligible narrative. Include what to expect along the way, as well as whether or not the trek or excursion was enjoyable. The roadblocks you encountered and how you overcame them.

A story's basic structure is straightforward: it has a beginning, a middle, and an end. You begin by introducing your audiences to your personalities (simply you or your buddies), the scene (the route you're hiking, what to expect, and how long it will take), and your goals (to reach destination campsite, to fix something about yourself).

You introduce the hurdles to your aim in the midst of your video. These barriers will build conflict and tension, keeping your viewers watching until the finish. Maintain the suspense by adding additional obstacles or obstacles on top of difficulties. Your vlog while hiking video watch time will rise as a result, and your website's bounce rate will drop.

Finally, discuss the success or failure of your journey, including whether or not you covered all of the locations, the expected vs. reality, whether or not all of them arrived safely, any difficulties with health or any of the hikers, obstacles, and resolutions, and so on.

Take the viewer along

According to Yoast's study and SEO (search engine optimization), it is critical to give viewers a sense of immediacy. Rather than informing your viewers about it later, try to display your vlog while hiking as it happens. If you pay attention to the verb tense you employ while you narrate your video — present, past, or future — you'll know you're "showing" rather than "telling". Present tense will be great as viewers will feel as though they are part of your vlog while hiking.

https://youtu.be/RLU0LDX7hcg
Sandakphu Trek - YouTube playlist.

Here's a tip to help you stay focused in the current moment. When things go wrong, get out your camera. Film the roadblocks to your ambitions as they occur. If you do this, your film will move in real-time rather than being a series of progress reports or end-of-day summaries. This also contributes to the suspense and tension.

Just go out and shoot videos

I understand why many people are afraid to film videos in public. This is more of a beginning issue, similar to trying to start your car on a cold morning. You'll be more like a Formula One racing car once you start vlogging and become acclimated to it. Others in public, on the other hand, are apathetic and do not even care about strangers.

Vlog while hiking at good locations

If you are still anxious after all of this, you may walk to a corner or wait for others to go away before beginning to record. To be honest, people are used to seeing other people making different kinds of films, dance and vlogging in public places is not anything you need be concerned about. Vlog when hiking is considerably easier because there aren't many people around.

Talk about the Hiking Trail

The location is an essential component of every storytelling. You should convey a strong feeling of location through your video visuals and commentary. Identifying the trail you're on isn't enough. Instead, attempt to offer enough information so that a reader can pinpoint your exact position on Google Maps. As you can see in the Goa hiking blog postings, I have included Google maps. Geographical borders, important landmarks, bodies of water, mile markers, and so on should all be named and described. 

vlog while Hiking in the forest - Samanden to Molley
Sandakphu Trek, India

Also, mention the trial's condition. As you can see in this Kashmir Great Lakes day 2 blog article, I started traversing three woods, and in the Sandakphu hiking from Samanden to Molley, these movies contain clear pictures of where you are, turns, significant sites, and so on.

Vlog while hiking even if it's bad weather

Vlogging when trekking in severe weather might be quite difficult. Most hikers wind up burying their costly photographic equipment deep within their backpack. This is where I employ smaller waterproof cameras, like as the DJI Action, a GoPro, or a smartphone. I also use my monopod as a trekking pole, which has shown to be effective in practically all of my outdoor activities. Check out this video to know more on what's inside my camera bag. Give importance to Mic. You do not need an expensive camera to vlog, start with your basic android phone or an iPhone. Practice, make it consistent to upload videos, and then start upgrading.

https://youtu.be/u7oIqM5vOgc

Include people for better Storytelling

Building a personal brand is important, but while vlogging, having only you all the time may make your video dull to viewers, and viewers may simply drop out. To prevent this, add other trekkers, local guides, trek leaders, their hiking stories, interaction with locals in the mountains and distant villages, local food, your stay or visit to the local hamlet or hut, and the lives of local people in the mountains, include these in your vlog while hiking.

Instead of merely presenting the normal trekking trail, this will make your storytelling more intriguing. It took some time for me, and as I learned how to produce better clips, I kept adding additional features. Feel free to experiment with new ideas and check Google or YouTube analytics to measure your success. 

vlog while hiking on cold and bad weather

Do not fake it - Be Authentic

What people want to see is a real-life person dealing with real-life problems. That's why they're watching your hiking videos rather than something polished on OTT applications like Man Vs Wild. It's not only acceptable but also required of you to adopt the YouTube vlogging philosophy. You are not creating a documentary film, but rather a YouTube video.

Don't be embarrassed to identify as a vlogger. The finest YouTube vlogs, not the best Bollywood documentaries, should be your models. Tell your tale as much as possible through photographs and short films. Fill up the blanks with your narrative. Use soft music rather than EDM or heavy metal. While editing, add music based on the mood of the video.

Hope you enjoyed reading this blog post. Buy me a coffee to support my work or you can go to my store to buy some of my images. Also, do not forget to join my FriendZone by signing up for my newsletter. Consider subscribing to my YouTube channel.

11 ideas to think like a Professional Photographer

During my early days of photography, I used to wonder how two individuals could take a shot of the same subject and have one seem mediocre while the other appears magnificent, despite the fact that both photographs were captured at the same time of day with the same lighting, etc. In this blog article, I'll provide some helpful ideas to think like a professional photographer.

Ideas to think like a Professional Photographer

What does shooting low mean in photography?

The great majority of photographs are taken at eye level. One technique for creating a dynamic image is to get down on your belly and photograph with your camera practically touching or put on the ground. The seashell was photographed by putting the camera only a centimeter above the ground, as shown in the image above. Be cautious since dust and sand particles might easily penetrate your camera or lens.

What does shooting low mean in photography? - ideas to think like a Professional Photographer

Shoot High - Shooting from above

Shooting low is simple since most individuals have little trouble going down to the ground. When shooting from an elevated position, you will need a ladder or a monopod to lift your camera over your head to obtain the top perspective. You may have noticed this in product or food photography. But nowadays, you can use a drone for outdoor photography, and you can get really creative with shooting high and making it appear like an image obtained by a true professional photographer. As you can see, this shot was taken late at night while standing on the brink of a building.

Leading Lines in Photography

The most compelling images have leading lines that run from foreground to background, driving the viewer’s attention into the picture. You’re actually teasing the viewer’s imagination. Consider yourself the viewer of a picture as you capture it. How you may examine the image and travel across it. It’s wonderful to have something at the end of these lines as a subject. Leading lines is one of the most efficient methods to create a striking composition is to use leading lines. Read more on leading lines to capture stunning photos where you will get ideas to think like a Professional Photographer and how well you can use the leading lines to capture stunning images.

Punakha Suspension bridge in Bhutan

What's Up? - Point the camera Upwards

Remember to search things up. When out shooting, photographers sometimes overlook the fact that aiming the lens straight up may provide some of the most fascinating images. Make it a practice to glance up to see what's above you. The tall vertical trees recorded in this sample were photographed at Muir Wood Forest in California. Other ideas to think like a Professional Photographer with the camera upwards would be to stand in between buildings and capture something high above like an airplane.

Muir woods California
Muir Wood Forest, California, US. Photo Copyright: Ravindra Joisa

Why is framing important in photography?

Composing a picture is vital, and framing is one approach to capture the attention of viewers or produce a good image. If you capture a shot without framing, it will seem quite flat in comparison to an image taken with a frame when composing. A photograph without a frame is just another regular photograph. Read more here on Using Framing in Composition.

Hawa Mahal Framing of Photo

What is the purpose of a foreground?

The foreground, like the backdrop, plays a vital role in the composition. The foreground of an image acts as an introduction, helping to create the tone for the remainder of the image. It's the first thing that catches our eye and draws us into the picture.

Dead Centre composition

If your subject is in the middle of the frame, it typically indicates that the composition is lifeless because that's where the subject is in most amateur photos. The rule of thirds states that your subject should be placed 1/3 of the way from one of the frame's corners, but I just prefer to make sure that my subject is not centered. However, it is sometimes preferable to have it dead center in order to appear professional. The surrounds, the wooden railings present in the building on both sides of the central stupa, and even the cloud, leading towards the center of the photo in the image below.

Punakha Dzong

Isolate the Interesting subject

Just because something caught your eye and made you want to capture a frame doesn't imply the viewer would be pulled to the same spot. Why not isolate what catches your eye into a separate frame to more effectively show the audience what you want them to see? I made good use of the wide aperture here to make the backdrop blurry and only the subject in focus.

What time of the day is best for photography?

Professional photographers seek for the last hour before sunset and the first hour after daybreak. These hours, known as "the golden hour" or "magic hour," give the ideal light for taking spectacular photographs. Every photographer may benefit from learning how to use the golden hour. A lens with a greater aperture, such as f2.8, will enable more light to enter the sensor.

Surathkal Beach, Copyrighted to Ravindra Joisa

Long Exposure Photography

Long exposure is a method that involves leaving the shutter open for a longer period of time than normal. This enables us to record the motion of a moving element or more light from a night scene. When the shutter speed is slower than 1/60th of a second, it is termed long exposure in photography. The following photograph was taken at sunset, as the silky smooth sea waves were developing. The image below depicts a star trail caught using a particularly long exposure, in which the shutter is left open for a prolonged period of time. It is recommended to have a high-quality camera with a decent sensor and low-light capability.

Low light long exposure photo of star trail - ideas to think like a Professional Photographer

Shoot at Dark

Making photographs at night is an unusual habit. While experts in this field have profound enthusiasm for it and a never-ending drive for technical and artistic improvement, individuals more accustomed to daytime photography are sometimes unaware that tried and true photographic standards must often be changed or even ignored at night. It is difficult to concentrate on a subject at night. Also, experiment with no flash and lengthy exposure. Continue experimenting with different settings and you will be astounded by the results. You can go super creatives if you are looking for ideas to think like a Professional Photographer under dark or low light.

Paro Dzong at night

To conclude, the subject might be average, but it all depends on the way you capture it. Just having an expensive camera will not make you a better photographer, but the way you look at things, the angle used in capturing the subject of interest matters. So, think like a Professional Photographer and keep experimenting with new ideas that you learn from other photographers.

Related: Power of Light

Hope you enjoyed reading this blog post on ideas to think like a Professional Photographer. Leave a comment below if you have more ideas. Buy me a coffee to support my work or you can go to my store to buy some of my images. Also, do not forget to join my FriendZone by signing up for my newsletter. Consider subscribing to my YouTube channel.