If you are planning a trip to Bhutan and want to go from Phuentsholing to Paro, you should read this blog post. Phuentsholing, the doorway to the world of thunder dragons, is frequently recognized as the residence of the Himalayan Kingdom's kings and queens. Time flows slowly here, and the simplicity of the people compliments the peacefulness of nature. On the Himalayan foothills, this Bhutanese commercial hub is near the Indian town of Jaigaon. In Phuentsholing, there are a lot of places to visit where you can see the diversity of Bhutanese, Nepalese, and Indian cultures.
How to reach Phuentsholing Bhutan
If you are coming from India, you have two alternatives for traveling to Paro: through Phuentsholing or directly to Paro. It's worth mentioning that, as of this writing, if you're an Indian citizen, you don't require a visa. All you want is proof of Indian citizenship. In addition, if you are not an Indian, you may choose to travel directly to Paro.
For starters, a flight from Mumbai to Paro is more expensive. If you are flying from Bangalore to Bhutan, the best option is to travel directly to Bagdogra, West Bengal. Although daily flights are available, I do not recommend going through Delhi. Second, after arriving in Bagdogra, take a shared cab to Phuentsholing. The travel will take between 4 and 5 hours. The India-Bhutan border crossing is open during the day but closes at 8:30 p.m. One of the hotels in Phuentsholing after crossing the border. Phuentsholing hotels are reasonably priced and plentiful, as this is the commerce center between the two nations.
I raced to the visa office the next morning which is in the town center. Even though Indians do not need a visa to enter Bhutan, we must obtain authorization and show various authentic documents, such as passports. Prepare a few photocopies and xerox copies. It will take a few hours for the approval to reach two locations. While others snacked, we proceeded to "Zangtopelri," which I suppose is a temple. It should be noted that, according to current updates, Indian tourists are paid an admission fee, but it is significantly cheaper than in other nations.
Places To Visit In Phuentsholing
If you have a day or two to spare then consider visiting the following places.
Bhutan Gate
Amo Chhu Crocodile Breeding Centre
Zangto Pelri Lhakhang
Zangto Pelri Park
Karbandi Monastery
Torsa River Side
Phuentsholing Market
Phuentsholing Viewpoint
Phuentsholing Park
Palden Tashi Chholing Shedra
Phuentsholing to Paro
We stashed our luggage and boarded a minibus bound for Paro from Phuentsholing. The entire explanation may be seen in the video below. Our permits were checked at a checkpoint along the highway. In appearance, the trail mimics the western ghats of southwest India. Greenery abounds, and Indian BRO keeps the road nice. The vast majority of them do not exceed 60 kilometers per hour. Furthermore, with a lunch break in between, it took us almost eight hours to arrive at Paro.
If you don't want to waste time driving from Phuentsholing to Paro, which takes two days if you come from Bagdogra, try flying directly to Paro. Paro has an airport, which is regarded as a dangerous site to land since only a few highly qualified and talented pilots are permitted to fly here. These pilots are familiar with the terrain and can land safely by gliding in the valley. You can, however, spare a day to tour Paro and see the Dzong.
Paro town remains quiet after dark, most of the shops are still open and there are a few cozy places where you can hang out with your friends and explore shops where they sell antiques and artwork. On the next day, you might want to start exploring Paro with a hike to Tiger's Nest, an incredible cultural monument. A visit to Tiger's next will take the entire day, so it is better to start early.
https://youtu.be/kL_wbvBNj_M
In short, the day from Phuentsholing to Paro is more of travel. Read more on the top places to visit in Bhutan. Also, you might want to read more to know every hidden place, festival, local cafe, etc here in this book. Support my work by subscribing to my YouTube channel for more travel and photography videos.
A not-so-known waterfall - Koosalli Falls, is a beautiful place to visit on a weekend if you are from Bangalore. An overnight journey in Dakshina Kannada, now the Udupi district. The waterfall is in the middle of rain forest in western ghats. Koosalli falls is in Sharavathi valley and is deep in the jungle.
Koosalli Falls
Koosalli Falls, located in Sharavathi Valley, is approximately 300 kilometers from Bangalore and is an overnight excursion. Even though the falls are visible from afar, getting to the base or anyplace near the waterfalls requires a journey through the jungle. The first few minutes will be spent in a rubber plantation (private property), followed by entry into a forest managed by the Karnataka forest department.
There is a route that leads all the way to the falls, however, it may be closed due to dense vegetation. The route can be adventurous at times because it is not well known to outsiders and not many people visit this location. Given the very dark woodland region, I would recommend visiting in a group rather than going alone.
It is worth noting that the Koosalli falls are located in the heart of the Western Ghats rain forest. The area is also widely known for King Cobra and Russel's Viper, two of the most dangerous and toxic snakes one may encounter. Keep an eye out for areas in and around the rocks near the waterfall and walkway. There are no hospitals nearby, and trekking back will take at least an hour.
Koosalli Falls Trek
This is one of the famous waterfalls near Kundapura. From the road's end to the start of the journey, one can take an auto. It takes around 45 minutes to one hour of walking from the beginning point through the dense forest to reach the summit and enjoy the view of this beautiful waterfall. The journey is more of a flat walk in the densely growing creepers and climbers, small muddy trails, and super slippery rocks near the waterfall. It is strongly advised to wear footwear with a solid grip. Because the forest is so dense, darkness sets in well before sundown. So plan to finish the hike before dark.
Where is Koosalli Waterfalls located?
Koosali Falls is a natural and untouched place near Shirooru, which is 76 kilometers from Udupi on NH 17 heading towards Karwar. Udupi is roughly 36 kilometers away from Kundapura. Koosalli Falls is a stunning waterfall located in deep woodland near the Koosalli hamlet, 45 kilometers from Murudeshwar, 95 kilometers from Udupi, and 20 kilometers from Shiroor (on the Udupi-Karwar route). The Koosalli waterfall lies 20 kilometers from Shiroor through Toodalli (also known as Soodalli) and 5 kilometers from the settlement of Koosalli.
The stream ahead
A few kilometers from Koosalli Falls is a stream that goes farther, where you may spend the full day enjoying water activities. Because the water is not too deep, even individuals who have never swum before can enjoy it. However, you must use caution due to the slick stones. We liked it for a few hours because it wasn't raining, but the water level quickly rose once it started to rain. In less than 30 minutes, the water level had risen to double its original height, with a strong current. We couldn't tell if the water level had risen or fallen. So, if it's pouring, be cautious.
Most people think of Himalayan treks when they think of a week-long walk in India. There are several hikes in the Western Ghats, most of which are suitable for weekend excursions. Believe it or not, there are week-long treks in the south as well, including one in Goa called the Goa trek organized by the Youth Hostels Association of India.
This hiking trail is not well known as it requires special permission from Goa and Karnataka forest departments. The difficulties that hikers experience differ differently. The heat, the hike through the deep forest, deadly snakes, and dangerous animals, not the high altitude illness, are to blame. When compared to other treks, the Goa hike is a one-of-a-kind experience.
Trekking in Goa, especially over the new year, was a fantastic experience. We were in Goa and had the choice of attending the Sunburn music festival or going on a Goa hike. We chose a week-long Goa hike, and I feel it was a wise idea. Many new like-minded acquaintances were made, people from many backgrounds (not just IT guys) shared their stories, and we thoroughly enjoyed every day of our 10-day walk.
The first two days were spent registering and acclimating. We drove throughout Goa. The true trip began on day three when we spent the entire day walking along the Arabian Sea's beach. To go to the next campground, we boarded the local train. The rest of our Goa journey was spent in the deep rain forest.
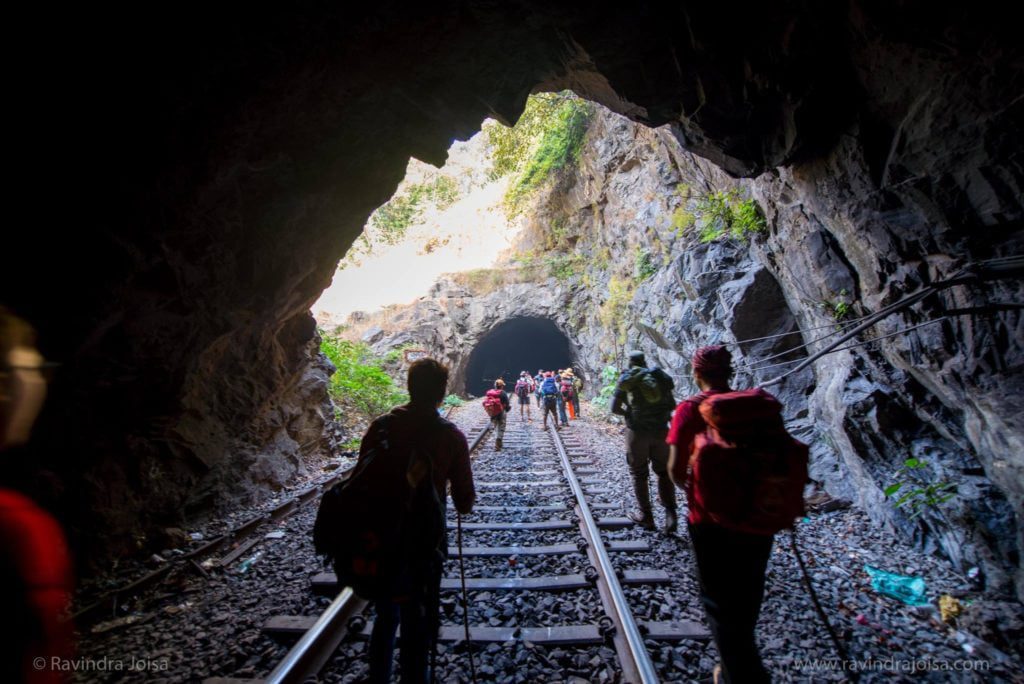
We spent the night near to the Dudhsagar waterfall, through many railway tunnels, more than ten to twelve streams, entered Karnataka's jungle, crossed Castlerock, and arrived at an ancient historic temple at Tambdi Surla. We bathed in practically every creek we crossed.
Goa Trek cost and what is included
The entire cost of this 10-day Goa trek including Youth hostel camps from Panjim to Panjim base camp was Rs. 3,990 (it has since escalated). Food, transport, train costs, forest admission in Goa and Karnataka, waterfall access, permits, guide charges, tent stay, insurance, cultural program at base camp, and a snake session are all included in the price.
Not all of them are granted permission to enter the forest. Forest Department rangers conducted numerous checks. This journey was completed in December-January 2015-16.
Goa Hike in Detail
Arrival at Panjim
The campground is in a fantastic location, near to the Mandovi River, and offers a strong connection. The market, which is located between the campsite and the Panjim bus terminal, is an excellent spot to visit near to the campsite. You may take the bus or go for a long stroll along the Mandovi River.
Visit in the evening to take in the sunset and a low tide walk along the shoreline. Miramar beach, which is a short walk from the campground, is a great place to spend extra time till it becomes dark. You might also go to the senior citizen park adjacent to our campground and watch the sailboats in the evening. Read more - Day 1 – Arrival at Panjim.
Miramar Beach to Dona Paula
The campground is in a fantastic location, near to the Mandovi River, and offers a strong connection. Just outside the campground is a shop where you may get any last-minute supplies. Visit in the evening to take in the sunset and a low tide walk along the shoreline.
Miramar beach, which is a short hike from the campground, is a great place to spend extra time till it becomes dark. You might also go to the senior citizen park adjacent to our campground and watch the sailboats in the evening. Hike from the campground to Raj Bhavan through Miramar beach to acclimate. Then it was on to Dona Paula and then back to the campground. Read more - Day 2 – Miramar Beach to Dona Paula
Benaulim Beach to Campal Sports Complex
The third day of the Goa trek is a long flat 11-kilometer walk from Benaulim beach to Cansaulim beach. In between, we visited some well-known south Goa beaches. This location is great for spending time with friends while on vacation.
South Goa beach is a beautiful location with a clean beach that is less congested, making it perfect for New Year's Eve celebrations. A beautiful location for water sports such as speed boats, parasailing, and other water sports. Read More - Day 3 - Benaulim Beach to Campal Sports Complex
Cansaulim to Dudhsagar Camp
The fourth day of our Goa trek from Cansaulim to Dudhsagar camp was a lot of fun. After spending the entire day on day 3 in Benaulim, Cansaulim beach, and so on, day 4 was very different as the entire track was in the forest. The first 45 kilometers were via railway, followed by a muddy jeep route and seven stream crossings in the forest.
On this day, we don't get to view the Dudhsagar waterfall, but we do arrive at the campground, which is quite near to the Dudhsagar waterfalls. The entire ten-kilometer route runs beside a railway track. Read more - Day 4 – Cansaulim to Dudhsagar Camp
Dudhsagar waterfall camp to Kuveshi
Day five of the Goa Trek was, in my opinion, the most anticipated of all. We had covered more than 12 kilometers of the trek, including the very famous Dudhsagar waterfall, tunnels, crossing the bridge that goes right across the waterfalls, then the steep climb to the tip of the waterfall and taking a bath there, followed by a long walk all the way to Kuveshi, which is in Karnataka. On day five, we begin our walk in Goa at the Dudhsagar campground and finish in Karnataka at Kuveshi. Read more - Day 5 – Dudhsagar camp to Kuveshi
Kuveshi to Anmod via Castlerock
The sixth day of our Goa trek was more of a journey through the forest, passing a few creeks and dry grassland. Despite the fact that this was a Goa trip, we spent the entire day in Karnataka. We traveled from one hamlet to a little town called Castlerock, then back into the woods to another community called Anmod. We had traveled roughly 17 kilometers in total. Read more - Day 6 – Kuveshi to Anmod via Castlerock
Anmod to Tambdi Surla
The seventh day of our Goa trip was a hard climb. Starting from a hamlet in Anmod, Karnataka, and continuing through the lush rain forest to Tambdi Surla, Goa. A location is well-known for its ancient temple and historical significance. The seventh day of our trek was largely in the jungle, which is ideal for folks who conduct bird study. From Anmod to Tambdi Surla campground, the journey takes around half a day and covers about 10 kilometers. Read more - Day 7 – Anmod to Tambdi Surla
Tambdi Surla to Panjim
Tambdi Surla was a wonderful place to stay. We were relieved to have completed seven days of the hike with only one day remaining. We were still in the thick of the rain forest, but we were quite close to the excellent spot since there was road access.
The old temple, a creek next to our campsite, a massage center in the middle of nowhere near our campsite, and a cabin where we all sat together the entire evening conversing non-stop gave us a sense of contentment. It was the last day of our journey, so it was a mixed bag of emotions. Day 8 was spent walking through the jungle, passing by an ancient Shiv mandir (temple) parallel to the stream. Read more - Day 8 - Tambdi Surla to Panjim
Goa Hike - YouTube Video Playlist
Enjoy watching all the YouTube video playlists below and don't forget to subscribe to my YouTube channel and my blog for more updates.
Hotels in Goa
Where to stay in Goa? - Because Goa is a tourist destination, staying there should not be an issue. Even during peak season, especially around the holidays, hotel prices can rise. The cheapest option is to get a dorm room at a hostel, of which there are several, but you must plan ahead of time.
Also, if you are a YHAI participant, you can extend your stay before or after the program by speaking with the local staff or the camp leader. We received assistance from them and stayed at the campsite for one more day, paying only 300 rupees more for meals and celebrating the New Year after finishing the hike. Hotels in Goa will undoubtedly be much more expensive at this time of year.
Domkhar rock art sanctuary is located in Leh's Domkhar hamlet, right on the banks of the Indus River. The location is well-known for prehistoric artwork created by tourists. The major source of income for the people in this region is apricot and apple cultivation. This is a destination for folks who appreciate the historical artwork of our forefathers. There are various rock-carved sculptures that are considered to be between 2000 and 4000 years old.
Where is Domkhar rock art sanctuary located?
Domkhar often spelled Damkhar, is a settlement in the Indian state of Ladakh's Leh district. It is situated in the tehsil of Khalsi. The Domkhar Rock Art Sanctuary was established in 2012 to protect the area's prehistoric petroglyphs. Domkhar contains about 200 dwellings. A visit to this place was a part of our Youth Hostel organized Lamayuru cycling expedition.
Domkhar, a little settlement on the banks of the Indus, is 160 kilometers from Leh. You may drive from Leh to Skurbuchan. Domkhar Rock Art Sanctuary is on the way to Sakar. Its rippling green meadows are studded with the shadows of towering poplars. Large stones line the rushing river, some black and polished, others veined with cracks, and many with prehistoric sculptures of men and monsters on their dazzling surface.
About Domkhar rock art sanctuary
I made my way through the rain to Domkhar Rock Art Sanctuary, where I pushed through the gates beneath the sanctuary's welcome board. I'm attracted to the warmth of a Ladakhi kitchen, where everyone sits cross-legged on the floor. This is the house of Stanzin Thangjuk, the farmer who has been important in conserving these rock engravings on his own.
The admission fee is Rs. 30 and includes butter tea and snacks. We could go to the owner's house because the area is private property. This was an opportunity for us to get to know the people, their way of life, and so on. The carpet and artwork in the hall were brightly colored. We drank the local tea, which was made of tea, yak milk, butter, and salt, with dried fruits and fresh apricots.
The Domkhar rock art refuge and farmland are both located in the owner's backyard. They raise apples and apricots on the fields, which are subsequently dried. This product is then packaged and sold on the local market or exported. There is also the chance to get things at a considerably lower price than what is accessible outside. A kilogram of dry apricot costs around 300 rupees.
What is rock art called?
Rock art is defined by anthropologists and archaeologists as pictures cut, sketched, or painted onto immovable rock surfaces. Petroglyphs are images that have been etched or engraved onto the rock. Pictographs are images created using paint or other pigments. Paintings, sketches, engravings, stencils, bas-relief carvings, and figures made of beeswax in rock shelters and caves are examples of rock art.
We continued on our journey to the Domkhar rock art refuge. The prehistoric engravings on the gleaming black stone were stunning. The Domkhar rock art sanctuary is located right adjacent to the bank of the Indus River, where most ancient travelers rested overnight or for a few days before continuing their journey. The artwork is stunning and in excellent shape. The carvings depict prehistoric hunting scenes, numerous animals, anthropomorphic characters, written language, religious symbols, and other symbols.
There are further rock drawings throughout the 35-kilometer stretch between Domkhar and Khalste hamlet, however many have been ruined by human activities. Many academics, both Indian and international, performed an admirable job of investigating Ladakh's rock art, but this did not aid in the preservation of the petroglyphs. Such petroglyphs can be found all across Ladakh, with notable locations outside of Domkhar being Tangtse, Khaltse, Kharu, and Biama.
It is a must-see if you are in the vicinity of Lamayuru. At Domkhar rock art refuge, you can also purchase native herbal remedies, honey, and dried fruits. To get a sense of the location, watch the video above. Hope you enjoyed reading this blog post. Buy me a coffee to support my work or you can go to my store to buy some of my images. Also, do not forget to join my FriendZone by signing up for my newsletter and SUBSCRIBE to my YouTube channel.
Have you ever captured an image and wondered why it is blurry? This is a typical problem that most of us confront when taking pictures. The major problem is the camera shake, which should have been taken into account throughout the capture. In certain circumstances, we purposefully create blur to deflect the viewer's attention away from the subject.
Why are my photos not sharp?
If the subject in your photograph is fuzzy but anything closer to the camera or farther away is perfectly in focus and clear, the problem is most likely one of focus. If the entire image is hazy and nothing is crisp, it is usually due to using a handheld shutter speed that is too lengthy. Blurred photographs might stem from a lack of understanding of your own camera and how to use it.
How do you stop blurry pictures?
Low light. The camera needs more light and this can be achieved using shutter and aperture.
Keep the aperture wide open f2.8 etc. This allows the camera sensor to capture more light.
Shutter speed. Make sure that the shutter speed is always more than the zoom range. Example: for 55mm the shutter should not be lesser than 1/60th of a second.
For zoom lenses, vary the shutter as per the zoom value.
Try increasing ISO under low light.
Use a tripod, not just some ordinary free tripod that you get along with your camera - Read more on tripods here - link.
Switch on VR (Vibration reduction) or IS (Image stabilization), but don't be fully dependent on it.
Capture in RAW and take manual control instead of automatic.
Once you capture, check the image on the display screen. Zoom into the image and check the edges of an object.
For those using HDR, make sure that you don't move while capturing HRD images. You will capture 2 to 3 different images at different time intervals in a very small interval of time. It then stitches these images together.
Low light photography and use of wide-angle with f2.8 aperture. Image captured at Dal Lake, Kashmir, India.
How do you make your camera blurry on purpose?
To get blurry photographs, take many shots with a fast shutter speed. Adjust the shutter speed on your camera to roughly 1/30th of a second. Follow a moving item with your camera until it passes the center of your lens.
How to Take Blurry Pictures?
Blurriness is typically used to indicate movement in photographs, but it may also be used artistically to improve your photos. A simple and frequent approach to shooting with blurring effects in the backdrop is to employ the bokeh lighting technique, which makes the subject of a shot seem concentrated while the background is blurred. With bokeh lighting and other approaches, you'll be able to produce fuzzy photos by changing the camera settings on your phone, utilizing different modes on a DSLR camera, and adjusting the light source in your shot.
Creating Blurs with a Mobile Phone - Use portrait mode on your mobile device. This function is now accessible in the majority of mirrorless or DSLR cameras too. You may use editing applications on your iPhone or Android device to take and edit images. Also, while taking the photo, zoom close on the main subject to blur the surrounding.
Using a DSLR or Mirrorless Camera to Take Blurry Photos - Set your camera to shutter priority mode to lower the shutter speed and use a wider lens to create a hazy backdrop. Take many images with a quick shutter speed to obtain blurred photos, then use a macro lens to acquire zoomed-in shots.
Changing the Light Source. Find a decent light source for your photograph and position the subject to enhance the blur effect. You can experiment with reflectors and other light modifiers to achieve the desired effect.
How do you make foreground blurry and the background in focus?
Moving closer to and focusing firmly on your subject, as well as ensuring the backdrop is far away from your subject, makes it simpler to produce a blurred background. Short focal lengths have a broad field of view, which keeps features in the front and background in focus. To know more read the article - Understanding lens focal length.
Camera Panning, in the panning technique the focus should be on the subject.
There are other reasons, in case the subject moves, in which case you will have to use the camera panning technique. You need to master this to get those right shots with controlled blur along with the focus on the subject. The only solution would be to practice.
Why is my Camera not focusing?
'Camera lens won't focus' is a common question and is one of my most viewed videos on my YouTube channel. I see that people have trouble focusing on the subject with some common focus issues that I have listed and how you can fix that without taking your camera to the service center to fix the issue.
https://youtu.be/MuE9EVfzYMc
https://youtu.be/Q0bhL5KQQx0
Hope you enjoyed reading this blog post and start practicing to capture photos and edit like a Professional Photographer. Buy me a coffee to support my work or you can go to my store to buy some of my images. Also, do not forget to join my FriendZone by signing up for my newsletter. Consider subscribing to my YouTube channel.
The second day of the mountain bike adventure takes you from Lamayuru Moonland to Skurbuchan. The first 5 kilometers are entirely downhill, passing through Moonland and several hairpins turns. The rest of the trip is flat, following the Indus Valley Road along the banks of the river. We had lunch in Domkhar and went to the 4000-year-old ancient Rock Art refuge. We kept cycling after lunch all the way to Skurbuchan, our next campground. From Lamayuru to Skurbuchan, the distance is 43 kilometers.
Lamayuru
Why is Lamayuru called Moonland?
On the previous day, we reached Lamayuru from Leh YHAI campsite. Because of its soil and setting, Lamayuru is a popular tourist destination noted for its monasteries and landscape. Visit the Lamayuru monastery. We set our tent near National Highway One (NH1), just outside the hamlet. On the steep slopes in this location, there is a unique type of mud. Because of this unique type of dirt, the mountainside sparkles on full moon days, earning the name Moonland.
Mountain biking route from Lamayuru Moonland to Skurbuchan
The ride downhill from Lamayuru
For the following five to eight kilometres, the ride from Lamayuru is entirely downhill. The road is riddled with hairpin turns. Because it is the national route One, NH1, which connects Kargil and Leh, expect little traffic. You just require control over the brakes; there's no need to peddle; simply relax in the saddle and enjoy the journey and scenery.
There is a creek to the right and a Buddhist temple on the opposite side of the stream once you've gone all the way down. Continue on the level road until you reach Khalsi's war memorial. Take a sharp left to enter the Indus Valley Road after seeing this monument. The rest of the day's ride is along the banks of the Indus River on the Indus Valley Road.
The region was formerly heavily shelled by our neighbouring country, which was eventually reclaimed by our forces. The scenery along the Indus Valley Highway is breathtaking. There are a few residences along the path, but no stores, cafes, or other amenities. As a result, make sure you drink enough water. The river water is difficult to obtain and is contaminated with silt, making it unfit for drinking. The river water also looks to be dangerous due to the current or the velocity of the water. We came to a halt at Domkar village, where we refilled our water bottles and ate our lunch beside to a creek.
https://youtu.be/V1epLC1OQqs
A visit to the historic Domkar Stone Art Sanctuary
Post lunch we continued for a while after which we visited a historic place known by the name Domkar Stone Art Sanctuary. We continued cycling after viewing this site, taking a mostly level route to our campground in Skurbuchan's settlement. Apricot farm is just next to the campground. At sunset, the vista of gold-colored mountain peaks is not to be missed.
Reaching Skurbucham campsite
We kept riding for a little more, stopping next to the stream for a break while waiting for the rest of the teammates to join us. We kept on till we arrived at a little village surrounded by high mountains and our tent in the center of an apricot field. We spent the evening touring the area and taking in the beauty of the night sky. On the next day, we went further from Skurbuchan to Sakar.
Tarsar Lake is a paradise for nature lovers, one of the most beautiful lakes in India. Untouched, clean, crystal clear water, amazing landscape, no human activities around, and a perfect place for peaceful meditation. Even the locals consider the water at Tarsar lake to be holy. A perfect place for camping, for landscape photographers, for night photography to get those Milkyway and star trail shots. The hiking trail is known by the name Tarsar Marsar lake trekking trail.
Tarsar Lake is almost a kilometer wide and two kilometers long. The view from the nearby mountain pass is breathtaking. From here you can go further to Marsar lake which is another beautiful lake or hike to Kolahoi peak and glacier which is another breathtaking place.
Tarsar trek itinerary
How to reach Aru camp?
The first day is all about going from Srinagar to Aru basecamp and the drive that is a part of this lovely Tarsar trek. It's a four-hour trip from Srinagar, including stops at the Saffron Farm and Apple Valley along the way. From Srinagar, there are two ways to reach Aru. The first is via Anantnag, which is the bus route, and the second is via Bijbehra/Apple Valley, which is a shortcut and where most cabs go to Aru. Read more on day 1 - Srinagar to Aru drive.
Hike from Aru to Lidderwat
The second day of my Himalayan trip to Tarsar was thrilling and adventurous, especially because it was pouring. The landscape along the walk was perfect for photographers like myself, with cloud-covered mountain peaks. I got ahead of schedule when I started from the Aru campground, but after rising for approximately a kilometer, the scenery surrounding me forced me to stop every five minutes and photograph everything. It was already dusk when I arrived at Lidderwat camping, and everyone else had already finished their meal. The scenery is breathtaking. Read more on day 2 - Aru to Lidderwat
Lidderwat to Shekwas
From Lidderwat to Shekwas camping, the third day of the Tarsar trek is a moderate rise. From 9100 feet at Lidderwat to 10700 feet in Shekwas, you gain around 1600 feet on this day. For the first hour, there is a strong ascent, followed by a one-hour level stroll. There is a point when you must bridge a creek, walk beside it for a time, and then gradually rise until you reach a boulder-strewn area. The Shekwas camp location is located after crossing these massive stones. Read more on day 3 - Lidderwat to Shekwas
Hike uphill to the beautiful Tarsar lake
The fourth day of the Tarsar walk is a slow ascent from Shekwas to Tarsar, passing through grassland, valleys, streams, and stones. As you ascend higher, the breathtaking scenery surrounding you is simply breathtaking. It's roughly a five-kilometer hike with a 500-meter elevation rise. Finally, you arrive at Tarsar Lake, a slice of heaven on Earth. Read more on day 4 - Shekwas to Tarsar
Exploring Tarsar Lake
Tarsar lake is one of the pristine lakes that you will find in the Himalayas. A day spent visiting Tarsar Lake and its environs is well worth the trek. The weather in the Himalayas changes by the hour, and it is impossible to forecast what will happen in the following hour. Snowfall, rain, bright sunlight, beautiful sky, mountains without snow, verdant meadows, and crystal clear water in the lake could all be seen in a single day. Read more on day 5 - A day at Tarsar Lake
Our walk took us from Tarsar Lake to Lidderwat through Jadsar Lake on the sixth day. If you intend on walking in this area, a day of camping at Tarsar Lake is a necessity. We didn't have the choice or permission to continue our journey to Marsar, so we had to return to Lidderwat through Shekwas. To go to Jadsar Lake, we bypassed Shekwas and took the parallel path, which is slightly higher in elevation. It was a hard drop to Lidderwat after spending some time in Jadsar. Read more on day 6 - Tarsar lake to Liddderwat via Jadsar
It took 6 to 7 days to complete the Tarsar trek. Tarsar Lake is reached after a three-day climb from Aru in India's Jammu and Kashmir state. You might continue on to Marsar and Sonasar lakes before finishing your trip in Sonamarg. We had no choice but to return to Aru from Tarsar. A day in Tarsar was fantastic, with camping close to the lake and Kolahoi peak on the opposite side. Jammu and Kashmir feature some of the world's most beautiful landscapes and lakes, in my opinion. The Kashmir Great Lakes Trek and Tarsar Marsar treks are a must-do if you're planning a hike in Kashmir.
Here are some pointers. Always add a day at the end of your schedule as a buffer. The weather may change quickly, so having an extra day before and after is a smart idea. It should not take more than half a day to go to Aru. So, if you arrive early, circumnavigate Aru. Also, if you haven't used your buffer day and get near Sonamarg on the highway, spend that day touring Sonamarg.
The availability of water is not an issue on any of these days. There are several Gujjar huts along the path, and if you come across one that appears to be abandoned, don't hesitate to peek inside or even stay. It's a once-in-a-lifetime opportunity. Once you've arrived at the campsite, I don't advocate remaining in your tent. Make the most of your time here by exploring as much as possible.
This location is fantastic for night photography. There is no light pollution in this area. If you bring your tripod, you may easily get star trails and milky way photos. Expect high winds, chilly temperatures, and maybe snow at times. Before you go on a hike make sure to check this out - some of the Absolute mandatory Hiking Accessories to carry.
https://youtu.be/N1T-9NynluE
There are many trekking groups like Indiahikes, Trek the Himalayas, and Youth Hostels (which are for Indian nationals and are cheaper) who can organize the trek or you can go on your own with locals. Hope you enjoyed reading this blog post. Buy me a coffee to support my work or you can go to my store to buy some of my images. Also, do not forget to join my FriendZone by signing up for my newsletter. Consider subscribing to my YouTube channel.