Capture impressive Cityscape during Nightfall that Stands Out

The cityscape image of buildings and city traffic that you see here is from the outer ring road at Bangalore City in India, usually crowded and full of traffic during daytime. The same place at night looks completely different after sunset. The images captured at dusk adds mood and extra dimension to the image.

Outer Ring Road, Mahadevapura, Bangalore, India

Here are few things that you might want to consider while capturing cityscape at dusk:

  • Capturing cityscape during nightfall requires a sturdy tripod. Read more on Tripod here as Tripod is a must if you want to master low light photography. The free tripod that you get along with the camera is good for your mobile phone or a point and shoot camera and not for your DSLR. I recommend a carbon fiber tripod.
  • Wireless or shutter cable release is a must. This is basically to avoid any kind of camera shake. Also, make sure to tie the camera strap to avoid any kind of movement.
  • A lens with aperture going up to f2.8 will be helpful. Preferably, use 14-24mm f2.8 lens or 50mm f1.4 lens. Wide aperture will allow more light to enter the sensor and hence better image. Higher aperture will allow less light and your camera will auto increase ISO to compensate when in auto mode. This will only add grains or noise when you do photography at night.
Albert Hall Museum Jaipur
Albert Hall Museum, Jaipur, India
  • The first 30-45 minutes after sunset (or golden hours) is the ideal time to capture photos. You can even get some amazing cloudscape that is golden colored and trust me, that looks amazing. Checkout my blog post - Capture Cloud movement using ND Filter to know more.
  • The street light (usually the sodium vapor lamp, incandescent) will be a dominant light source during this time. These days (in India) sodium lights are being replaced by the LED lights and you might need to adjust the kelvin value accordingly.
  • If it is too dark then make sure, fill the frame with well-lit objects. Indirect light source, long exposure, wide aperture can solve the problem of low light photography without increasing the ISO.
Rinpung Dzong, Paro, Bhutan
  • Capture in RAW format so that you can edit later. Always, prefer the RAW format as it will capture all the colors and can be recovered while editing. If you capture in JPEG which is a compressed format, it cannot be recovered.
  • Do not increase the ISO to max unless needed as it might add noise, instead, lower the aperture close to f2.8 or lower and increase the shutter. These days the cameras are good and increasing ISO will not add much noise. Noise will matter only if you want to see images or for professional use. It doesn't really matter for social media usage.
  • While editing, increase the shadows and decrease the highlights. You can do this and recover details from highlights and shadows, provided the image is captured in RAW format.
https://youtu.be/W3cjh8ApMi4

These are some of the basic rules that you need to follow which are simple, to get the best out of your camera. You need not have an expensive f2.8 lens to capture this. Just practice more to get the best out of your camera. Check out the time-lapse of Bangalore cityscape. Each frame in this time-lapse video is a long exposure shot captured for a certain period of time. Watch the video in HD for better quality.

Hope you enjoyed reading this blog post. Subscribe to my website and my YouTube channel for more photography tips and travel updates. Buy me a coffee to support my work or you can go to my store to buy some of my images. Also, do not forget to join my FriendZone by signing up for my newsletter.

Stunning and scenic landscape from Shakar to Haniskot - (Leh Mountain Biking - Day 4)

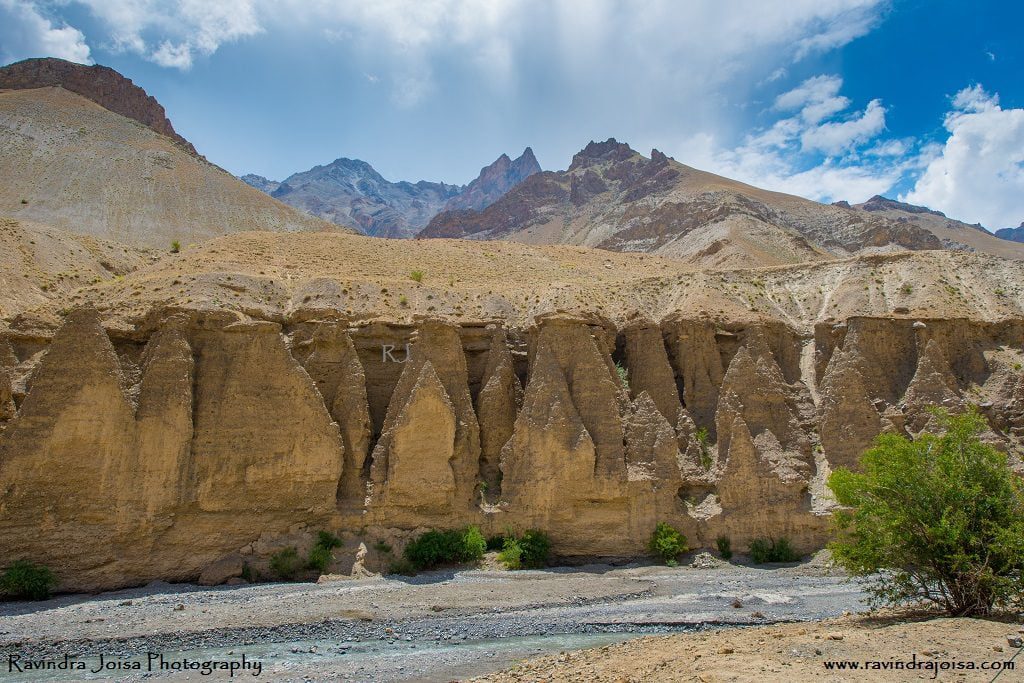
Our stay at a guest home beside the creek in Shakar was fantastic. We toured the area and began cycling on the Khangral-Sanjak route, passing through tiny villages until we reached National Highway One. The surrounding countryside is stunning, resembling a high-contrast picture. Because the area is so unique, soil erosion creates unique structures that have been unspoiled by people. The mountains in the backdrop, the green area in the middle, and the river in the front all appear to be from our elementary school painting class textbooks. On day 4, we traveled 38 kilometers from Shakar 2 to Haniskot.

Sakar to Haniskot

Previous days of cycling to this place

Day1 – Leh to Lamayuru

Day2 – Moonland to Skurbuchan

Day3 - Skurbuchan to Shakar

Shakar to Haniskot

Shakar to Haniskot - Leh Mountain Biking

Exploring Shakar Market road and campsite

Shakar is a lovely campground located near a brook that flows into the Indus. We stayed in an under-construction government guest house named the Tourist Facilitation Centre and spent the evening touring the campground and the surrounding Shakar market road hamlet. It is frequently chilly at night, making it a great location for a bonfire. Investigate the communities in and around Shakar. Try something different in Shakar, such as butter tea or local bread, and stay in one of their houses; after all, it is a one-of-a-kind experience. Make friends with the locals; they can be fantastic portrait subjects if you enjoy portrait photography or wish to film a documentary.

Khangral - Sanjak road

Cross the river across the bridge and continue on the Khangral-Sanjak route we took on day three. As we ride through villages and fields, there are several stores. We get to travel through the green patches and agricultural regions adjacent to the river and the dark multi-hued brown mountain peaks. Continue cycling up and down the mountain, following the Khangral-Sanjak route until you reach National Highway One at Khangral. Take a left at this crossroads, which will lead you to Leh. The road to the right will lead you to Kargil and Srinagar.

National Highway One - Shakar - Leh Mountain Biking

Stay at Haniskot

The most picturesque path is to the left. There are a few little stores along the road where you may stop and enjoy the scenery. Continue cycling till you reach Haniskot, another gorgeous location. Cycling here isn't difficult; just a few ups and downs might be difficult in the sweltering midday sun. Take a rest at one of the surrounding stores on your trip to Haniskot. The scenery is stunning, and it's an excellent location for taking photographs. Finally, we remained at the government bungalow/guest house, which was conveniently located adjacent to the highway.

A visit to remote village Kanji

A kilometer from this bungalow is a road to the right that takes you to a place named Kanji which is about 12 kilometers from the junction. The journey to this location is beautiful. The YHAI itinerary does not include a visit to Kanji. We arrived at Haniskot much early, and it was up to us to explore. A few of us who had the energy went a little further. The entire distance between Kanji and Tokyo is around 26 kilometers.

https://youtu.be/VfEzqrgVdfM

This cycling expedition was organized by the Youth Hostel Association of India and as you are reading this post, and interested in outdoor activities then check out the National trekking expedition in Goa. To get a sense of the location, watch the video above. Hope you enjoyed reading this blog post. Buy me a coffee to support my work or you can go to my store to buy some of my images. Also, do not forget to join my FriendZone by signing up for my newsletter and SUBSCRIBE to my YouTube channel.

Shoot in RAW format to get Incredible images

Nowadays, the majority of photographers record photographs in RAW format. Taking photos in RAW format provides advantages over taking photos in JPEG format. Most DSLRs and powerful compact cameras have the ability to take photographs in RAW format (.NEF format in Nikon, CRII format in Canon, etc). RAW images are frequently referred to as digital negatives.

Raw format - image after editing

Importance of capturing in RAW format

When photographs are recorded in JPEG format, the color information is compressed by the camera's built-in software (permanent loss of color information in an image). The JPEG image has around 250 odd color information, but the RAW image contains several thousand color information.

The photographer then downloads the RAW photographs from the memory card. The image is then tweaked to get the desired white balance, contrast, exposure, saturation, color, sharpness, lens correction, and so on. One of the most recent additions is the 'Dehaze' option in Lightroom when editing, which is quite handy. The ultimate output of a picture is determined not only by the image that is acquired but also by the editing abilities of the user.

RAW Format - Pre and Post editing

It is worth noting that the size of a RAW format image is significantly larger, nearly double that of a high-quality JPEG image. The size of the JPEG image is determined by the type of JPEG format used while capturing the image.

When do I capture images in RAW format and in JPEG?

  • Whenever I am on a photo assignment, project, paid photo shoot, photos that I plan to sell; I make sure that the images are always captured in RAW format.
  • The not so important, casual shots of known and unknown friends, unpaid work is something that I prefer to capture in JPEG.
  • My memory card was almost full. It happened to me during one of my Himalayan treks and I will not be traveling to that place again (as I have many more places to cover). My memory card was almost full and If I were to capture images in RAW format, it would almost double the space. I had two options - either to continue capturing images in RAW format and ignore the important shots later in the trekking trail or capture in JPEG (which takes half the space) and capture all the photos. I opted for the second.
  • If you are lazy and fine with JPEG quality and with what your camera has captured, then go ahead with JPEG.
  • Go for JPEG if you don't want to edit an image.
  • I have seen some of the photojournalists/war photographers capturing images in JPEG, where one of the conditions is not to edit images and the images are to be delivered in no time.
Surathkal Beach, Copyrighted to Ravindra Joisa
Surathkal NITK Beach, Copyright: Ravindra Joisa

Here's an example: in the above image, the foreground seemed dark and was subsequently modified by raising the shadows to be in details. The same is true for the backdrop sky, which was blown out in the original photograph. However, because it was captured in RAW format, I was able to retrieve the information from the sky region by reducing the shadows. You may do the same with JPEG photos, but the image quality suffers as a result. It will also be unsuitable for professional use. Note that the above image was captured after the sunset and the actual image appeared dark.

How to edit RAW format images?

The RAW format image always appears dull and is an incomplete image. It has to be processed using a photo editing software like Adobe Lightroom or Photoshop or other image editing software. Note that the RAW format images are not supported by the websites and has to be converted to JPEG or PNG format. I would highly recommend to super compress if it is for websites so that the image can load fast. By the way, you can go through my courses to know more on how to edit using Lightroom.

Subscribe to my blog and Youtube channel. Hope you enjoyed reading this blog post. Buy me a coffee to support my work or you can go to my store to buy some of my images. Also, do not forget to join my FriendZone by signing up for my newsletter.
Exclusive Interview with Smart Photography Magazine - Know It All

Here is my interview with Unnati Sagar from 'Smart Photography Magazine' on travel and landscape photography. Most of the images that were published were from my Himalayan treks and Bhutan trip. The interview was published in the April 2017 edition.

About Smart Photography Magazine

Smart Photography is a well-known photography magazine that discusses photography ideas, techniques, interviews with professional photographers, the newest camera and associated devices, photography contests, and so on. The magazine is well-known in India, and they select photographers based solely on their photographic work. In my situation, Smart Photography has provided me with a platform to showcase my work. Many amateur photographers have been given the opportunity to showcase their work and become well-known.

My interview and photos that were published

Smart photography magazine has selected carefully some of my best images and here are a few. Images: from Bhutan - The place of great happiness - Punakha Dzong and inside the second courtyard of Punakha Dzong.

Smart Photography

Bhutan is a separate cultural and natural entity. Perched high in the Himalayas, it is the world's last surviving Buddhist monarchy. It has created the Gross National Happiness concept, according to which development is measured using a holistic approach to well-being rather than just GDP. The kingdom's primary sources of revenue are tourism, hydroelectric power, and agriculture. There are numerous locations to visit in Bhutan, but if you are on a budget and just have a few days, these are the top ten places to see in Bhutan.

Images: View from Dochula Pass, Bhutan, and Tashichho, Thimpu, Bhutan.

Smart Photography - Ravindra Joisa Interview

Images: Captured this next to our campsite on day 2 during our Aru to Lidderwat trek and the second picture is of Bodhi tree inside the first courtyard of Punakha Dzong, Bhutan. Also, read complete details with photos and videos on the Tarsar trek here.

Tarsar Lake, one of India's most beautiful lakes, is a nature lover's heaven. Untouched, pure, crystal clear water, breathtaking scenery, no human activity around, and an ideal location for solitary meditation. Even the natives regard the water of Tarsar Lake as sacred. A fantastic location for camping, scenery photography, and night photography to capture the Milky Way and star trails. This lake is over a kilometre long and nearly a kilometre broad. The view from the neighbouring pass is spectacular.

Smart Photography - Ravindra Joisa Interview

Image: Surathkal Beach, Mangalore, India. This is a long exposure shot. To know more about long exposure shots, check out my previous article - controlling the picture-taking process. The second image is from Lidderwat, Jammu, and Kashmir, India.

Image: Aru, on the way to Lidderwat, Tarsar trek, Jammu, and Kashmir, India.

Kuduremukh, Western Ghats, Karnataka, India - Read complete details on the Kuduremukh trek here.

If you're in Bangalore, the Kudremukh hike is a must-see for its breathtaking landscape. This is a circular trip that entails crossing more than ten creeks as well as extensive grasslands. Kudremukh is Kannada for "horse's face." The summit's distinctive shape prompted its name. Because it was accessible from Samse village, this was formerly known as Samseparvath. Kudremukh lies in the district of Chikkamagaluru, in the heart of the Western Ghats. It is part of the Kudremukh National Park, the western ghats' second-largest wildlife sanctuary.

Smart Photography - Ravindra Joisa Interview

Image: Capture this amazing landscape at noon during my visit to Key Monastery in Spiti, Himachal Pradesh, India. The second image is from Naranag forest, my last day of the Kashmir Great Lakes trek. Check out this link to know more about Narang forest.

Smart Photography - Ravindra Joisa Interview

Image: I had high altitude sickness and did not climb further. Instead, spent two days at Kanamo base camp capturing some amazing shots of landscape and wild animals.

Special thanks to Smart Photography magazine for the interview and for publishing the same in the magazine. To know more details on this, download the legal magazine copy from the Smart Photography website mentioned above or from the Jio magazine app.

Follow me on social media and subscribe to my blog for more updates on travel and photography. Also, subscribe to my Youtube channel for more videos and travel stories.

Skurbuchan to Shakar - (A wonderful cycling experience on day 3)

Day three of our cycling, from Skurbuchan to Shakar was another exciting one. Cycling next to the Indus river on Indus valley road, the amazing landscape, cycling through the apricot farmland, river crossing, cycling next to the stream, cycling downhill and extremely tiring uphill followed by camping next to the stream.

Ravindra Joisa at campsite Mountain Biking

Check out the first two days of our cycling here

Day1 – Leh to Lamayuru

Day2 - Moonland to Skurbuchan

Where to stay in Skurbuchan?

If you are traveling solo to this beautiful remote village in Skurbuchan then you might want to consider staying at homestays at Aryan valley. There are places where you can camp and on the way you will find small shops where some of the rations are available which is good enough if you are planning to camp. Also, there is a government guesthouse. Watch this video below to know more.

About Skurbuchan

Skurbuchan village is located above the Indus in western Ladakh, approximately 125 kilometers from Leh. The name of the settlement comes from a native fruit called 'Skyur,' which is exclusively cultivated in and near the village. The village, with a population of over 2000 people, is one of the largest in the region. Beautiful river streams, lush green meadows, and delightful walks make this settlement a perfect addition to any Ladakh itinerary. The settlement boasts a big Buddha statue on a mountaintop overlooking the entire village, from where you can admire the grandeur of Skurbuchan. Skurbuchan is also significant as the entryway to the well-known Aryan communities.

Skur Buchan to Shakar

At Skurbuchan campsite, enjoy the morning walk around the apricot farm and the local village. Have breakfast, pack your bags, and check for tire pressure before cycling. Take the mud route till you reach the main road. The route is mainly flat or downhill next to the river Indus, crossing a few villages. It is a long ride with hardly any water source.

The river water is all silt and cannot be used for drinking. It is dangerous to get all the way down to the river and also, the rapid flow of water, doesn't make this a safe place to get to the water. It is hard to find any shop on the way and we stopped at Indus cafe for a small tea break which is just before the Sanjak bridge.

Places to visit in Skurbuchan

When you go on a cycling expedition, it may not be possible to cover all the places as you need to stick on to the time and the scheduled plan. With YHAI it is strict and you cannot deviate from the plan unless you have approval from your guide, else you may be out of the expedition. But, if you are going solo which I recommend, or if you are on a casual vacation visiting on your own then you might want to consider visiting Buddha Statue, Skurbuchan Monastery, Indus River, Dah, and Hanu (Aryan Villages).

Skurbuchan to Sakar

Sanjak Bridge - Crossing the river Indus

Continue to pedal further till you reach a bridge that takes you to a village. The route from this place to our campsite is all uphill and is extremely tiring. We managed to pedal switching between first and second gear, with multiple breaks till we reached the next village. We had packed lunch and explored the place and had some fresh juicy apricot.

Post lunch we continued further uphill, but not too steep, next to steam. The landscape here isn't too dry and is full of trees and farmland. After cycling for almost 2 hours we crossed the stream and stayed at an under-construction government guest house. It was almost dark and we spent some time next to the stream. The place is now called the Tourist facilitation center, where you will have an option to stay. Also, just outside this place, you can even camp adjacent to the facilitation center on the river bank.

https://youtu.be/IseSHssSDMo

On day 4 we went further from Shakar to Haniskot with some stunning and scenic landscapes. To get a sense of the location, watch the video above. Hope you enjoyed reading this blog post. Buy me a coffee to support my work or you can go to my store to buy some of my images. Also, do not forget to join my FriendZone by signing up for my newsletter and SUBSCRIBE to my YouTube channel.

Phuentsholing to Paro - Journey to the beautiful Himalayan kingdom

If you are planning a trip to Bhutan and want to go from Phuentsholing to Paro, you should read this blog post. Phuentsholing, the doorway to the world of thunder dragons, is frequently recognized as the residence of the Himalayan Kingdom's kings and queens. Time flows slowly here, and the simplicity of the people compliments the peacefulness of nature. On the Himalayan foothills, this Bhutanese commercial hub is near the Indian town of Jaigaon. In Phuentsholing, there are a lot of places to visit where you can see the diversity of Bhutanese, Nepalese, and Indian cultures.

Phuentsholing

How to reach Phuentsholing Bhutan

If you are coming from India, you have two alternatives for traveling to Paro: through Phuentsholing or directly to Paro. It's worth mentioning that, as of this writing, if you're an Indian citizen, you don't require a visa. All you want is proof of Indian citizenship. In addition, if you are not an Indian, you may choose to travel directly to Paro.

For starters, a flight from Mumbai to Paro is more expensive. If you are flying from Bangalore to Bhutan, the best option is to travel directly to Bagdogra, West Bengal. Although daily flights are available, I do not recommend going through Delhi. Second, after arriving in Bagdogra, take a shared cab to Phuentsholing. The travel will take between 4 and 5 hours. The India-Bhutan border crossing is open during the day but closes at 8:30 p.m. One of the hotels in Phuentsholing after crossing the border. Phuentsholing hotels are reasonably priced and plentiful, as this is the commerce center between the two nations.

Phuentsholing

I raced to the visa office the next morning which is in the town center. Even though Indians do not need a visa to enter Bhutan, we must obtain authorization and show various authentic documents, such as passports. Prepare a few photocopies and xerox copies. It will take a few hours for the approval to reach two locations. While others snacked, we proceeded to "Zangtopelri," which I suppose is a temple. It should be noted that, according to current updates, Indian tourists are paid an admission fee, but it is significantly cheaper than in other nations.

Places To Visit In Phuentsholing

If you have a day or two to spare then consider visiting the following places.

  • Bhutan Gate
  • Amo Chhu Crocodile Breeding Centre
  • Zangto Pelri Lhakhang
  • Zangto Pelri Park
  • Karbandi Monastery
  • Torsa River Side
  • Phuentsholing Market
  • Phuentsholing Viewpoint
  • Phuentsholing Park
  • Palden Tashi Chholing Shedra

Phuentsholing to Paro

We stashed our luggage and boarded a minibus bound for Paro from Phuentsholing. The entire explanation may be seen in the video below. Our permits were checked at a checkpoint along the highway. In appearance, the trail mimics the western ghats of southwest India. Greenery abounds, and Indian BRO keeps the road nice. The vast majority of them do not exceed 60 kilometers per hour. Furthermore, with a lunch break in between, it took us almost eight hours to arrive at Paro.

Paro Dzong at night

If you don't want to waste time driving from Phuentsholing to Paro, which takes two days if you come from Bagdogra, try flying directly to Paro. Paro has an airport, which is regarded as a dangerous site to land since only a few highly qualified and talented pilots are permitted to fly here. These pilots are familiar with the terrain and can land safely by gliding in the valley. You can, however, spare a day to tour Paro and see the Dzong.

Paro town remains quiet after dark, most of the shops are still open and there are a few cozy places where you can hang out with your friends and explore shops where they sell antiques and artwork. On the next day, you might want to start exploring Paro with a hike to Tiger's Nest, an incredible cultural monument. A visit to Tiger's next will take the entire day, so it is better to start early.

https://youtu.be/kL_wbvBNj_M

In short, the day from Phuentsholing to Paro is more of travel. Read more on the top places to visit in Bhutan. Also, you might want to read more to know every hidden place, festival, local cafe, etc here in this book. Support my work by subscribing to my YouTube channel for more travel and photography videos.

Koosalli Falls - A beautiful 6 steps cascading hidden waterfall

A not-so-known waterfall - Koosalli Falls, is a beautiful place to visit on a weekend if you are from Bangalore. An overnight journey in Dakshina Kannada, now the Udupi district. The waterfall is in the middle of rain forest in western ghats. Koosalli falls is in Sharavathi valley and is deep in the jungle.

Koosalli Falls

Koosalli Falls, located in Sharavathi Valley, is approximately 300 kilometers from Bangalore and is an overnight excursion. Even though the falls are visible from afar, getting to the base or anyplace near the waterfalls requires a journey through the jungle. The first few minutes will be spent in a rubber plantation (private property), followed by entry into a forest managed by the Karnataka forest department.

Koosalli Falls

There is a route that leads all the way to the falls, however, it may be closed due to dense vegetation. The route can be adventurous at times because it is not well known to outsiders and not many people visit this location. Given the very dark woodland region, I would recommend visiting in a group rather than going alone.

It is worth noting that the Koosalli falls are located in the heart of the Western Ghats rain forest. The area is also widely known for King Cobra and Russel's Viper, two of the most dangerous and toxic snakes one may encounter. Keep an eye out for areas in and around the rocks near the waterfall and walkway. There are no hospitals nearby, and trekking back will take at least an hour.

Koosalli Falls Trek

This is one of the famous waterfalls near Kundapura. From the road's end to the start of the journey, one can take an auto. It takes around 45 minutes to one hour of walking from the beginning point through the dense forest to reach the summit and enjoy the view of this beautiful waterfall. The journey is more of a flat walk in the densely growing creepers and climbers, small muddy trails, and super slippery rocks near the waterfall. It is strongly advised to wear footwear with a solid grip. Because the forest is so dense, darkness sets in well before sundown. So plan to finish the hike before dark.

Where is Koosalli Waterfalls located?

Koosali Falls is a natural and untouched place near Shirooru, which is 76 kilometers from Udupi on NH 17 heading towards Karwar. Udupi is roughly 36 kilometers away from Kundapura. Koosalli Falls is a stunning waterfall located in deep woodland near the Koosalli hamlet, 45 kilometers from Murudeshwar, 95 kilometers from Udupi, and 20 kilometers from Shiroor (on the Udupi-Karwar route). The Koosalli waterfall lies 20 kilometers from Shiroor through Toodalli (also known as Soodalli) and 5 kilometers from the settlement of Koosalli.

The stream ahead

Koosalli Falls

A few kilometers from Koosalli Falls is a stream that goes farther, where you may spend the full day enjoying water activities. Because the water is not too deep, even individuals who have never swum before can enjoy it. However, you must use caution due to the slick stones. We liked it for a few hours because it wasn't raining, but the water level quickly rose once it started to rain. In less than 30 minutes, the water level had risen to double its original height, with a strong current. We couldn't tell if the water level had risen or fallen. So, if it's pouring, be cautious.

Koosalli Waterfall YouTube video

https://youtu.be/GQEbOrmo0MU

Hope you enjoyed reading this blog post. Buy me a coffee to support my work or you can go to my store to buy some of my images. Also, do not forget to join my FriendZone by signing up for my newsletter. Consider subscribing to my YouTube channel.